
Back in the summer when I first thrifted this steamer pot insert, I intended on making something Christmas-y with it. The strainer holes reminded me of a Christmas tree, after all. But the holiday season came and went before I could get to it! So, I decided to revamp my idea of tree embroidery on it as January decor instead.

Image credit: Sadie Seasongoods.
See what I mean, though? Kind of like a modern pine tree shape! And those holes were just begging for some embroidery.

Image credit: Sadie Seasongoods.
So, I decided to put my plan into action, but with hygge in mind- not the holidays.
This post contains affiliate links for your crafting convenience. As an Amazon Affiliate, I earn from qualifying purchases. All blue, bold, and underlined text is a clickable link, either to a product or to a related post.
Pine Tree Decor in Winter
First, I removed the handle (easy peasy) and gave the steamer basket a thorough cleaning. Mostly to remove the grease pencil or crayon-written price!

Image credit: Sadie Seasongoods.
As I pondered the colors to use, I thought back to this winter project from last year. Using the same color combo was appealing, so I set up my spray painting station out back.

Image credit: Sadie Seasongoods.
Now, to add a hint of blue, I decided to paint the rim of the steamer pot insert. Almost like vintage enamelware!

Image credit: Sadie Seasongoods.
Note to self for future projects. Emulating the look of vintage enamelware is pretty easy! And it looks darn good, if I do say so myself.

Image credit: Sadie Seasongoods.
Pine Tree Embroidery
Next, I headed back outside to give the whole thing a protective topcoat. Since I was planning on doing some tree embroidery with a metal needle, I didn’t want to accidentally nick up the paint!

Image credit: Sadie Seasongoods.
When everything was good and dry, I gathered some green embroidery floss. Time for the tree embroidery on my steamer basket!

Image credit: Sadie Seasongoods.
Since fancy stitches seemed unnecessary, and I liked the idea of a very simple, modern style, I simply did long stitches in the triangle pattern.

Image credit: Sadie Seasongoods.
And maybe it looks more like a mountain than a pine tree? But the green looked great with the white and blue, so I decided to just run with it.
Last, but not least, I cut out a circle of brown felt that I glued to the bottom of the bowl.

Image credit: Sadie Seasongoods.
Since I was planning on setting this on a vintage cedar chest, I thought a soft, protective barrier was a smart move. I chose brown felt so that it blended in seamlessly (sightlessly?) on the walnut finish of the chest.
Tree Embroidery on a Steamer Pot Insert
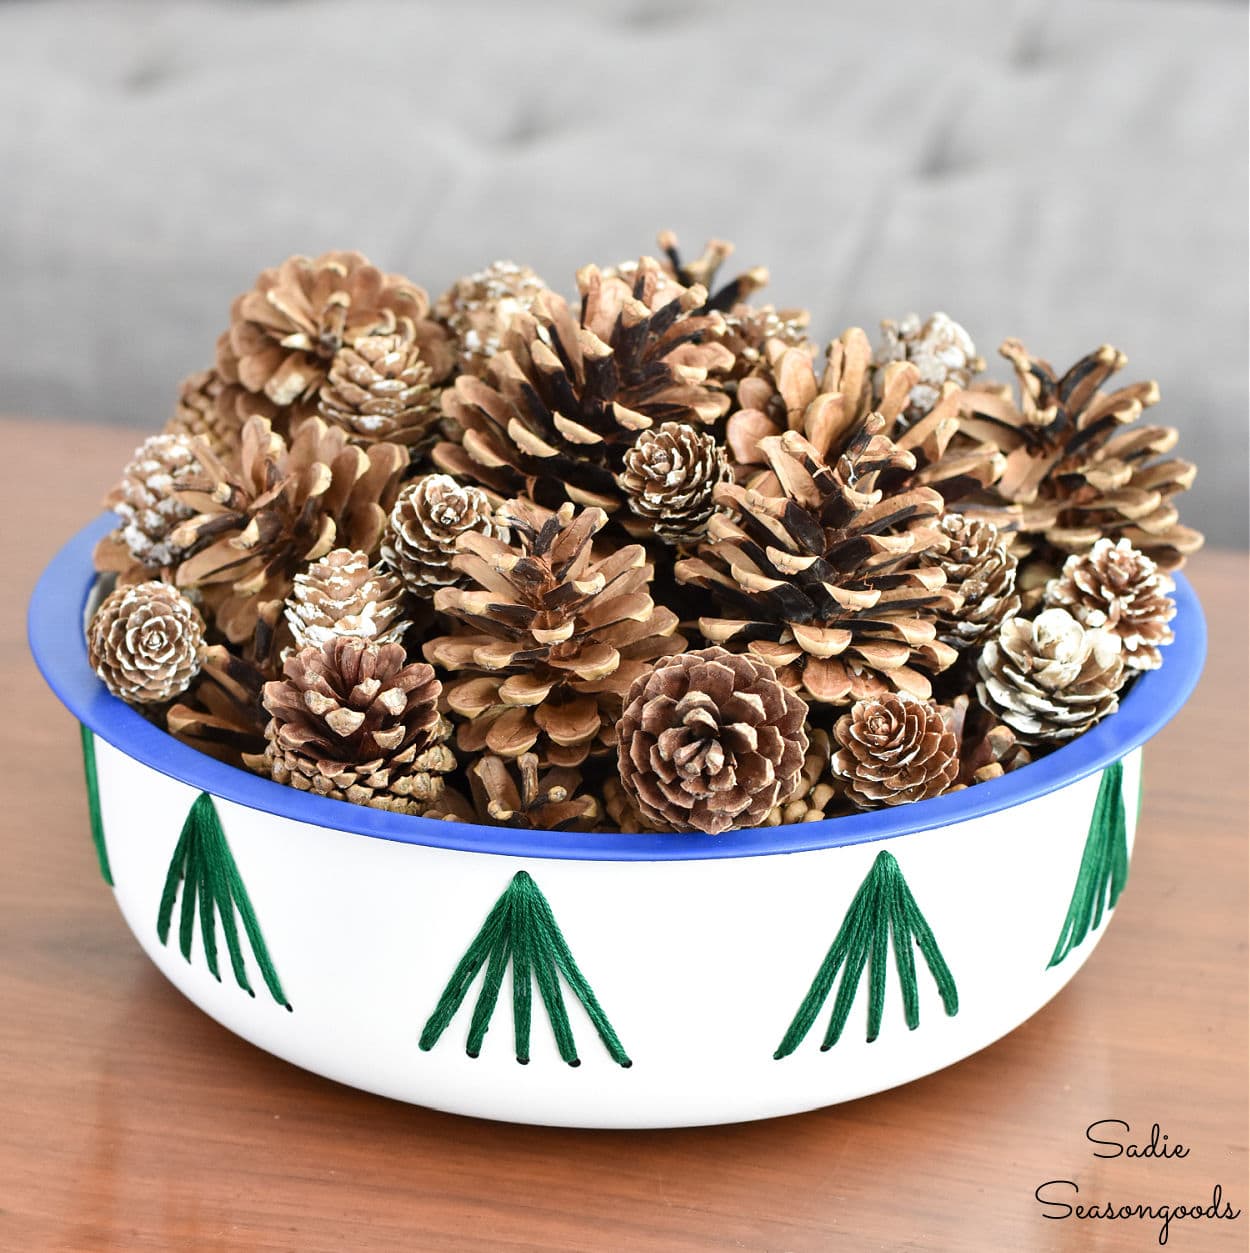
From there, I simply filled my “bowl” with pinecones in different sizes! Some collected outside, some from a craft store.

Image credit: Sadie Seasongoods.
I just LOVE how it turned out! Winter decor that feels modern and unassuming, but with that unexpected upcycling touch!

Image credit: Sadie Seasongoods.
Another bonus of the felt on the bottom? It covered up the strainer holes so that any pinecone “schmutz” stays in the bowl and not on my cedar chest- BONUS!
*****
AND, today is Thrift Store Decor Team Day! So, I hope you’ll check out all the fun projects that my fellow blogging gal-pals have been up to.

1. How to Spray Paint Wood Furniture – My Uncommon Slice of Suburbia
2. How to Upcycle a Vintage Metal Library Stool – Shop at Blu
3. Upcycling Plates into a Snowman – House of Hawthornes
4. Shutter Mail Organizer – My Repurposed Life
5. How to Upcycle a Floral Centerpiece – Petticoat Junktion
6. Pine Tree Embroidery for Winter Decor – Sadie Seasongoods
7. How to Easily Paint Wicker – Our Southern Home
8. Upcycled Step Ladder Decorating Ideas – Reinvented Delaware
9. Thrifted Wooden Box Boho Makeover – Organized Clutter
*****
Well, I hope you enjoyed this idea for January decor with tree embroidery on a steamer basket! I always love finding unexpected things to stitch on (anyone remember this July 4th project?), and this thrifted piece was no exception!
For even more upcycling ideas for winter decor, I hope you’ll check out this collection before you go!

Craft on!
S
Want to be notified when I publish my next upcycling project tutorial?
Join me on Social Media:


PIN ME!

Image credit: Sadie Seasongoods.
Sarah Ramberg is the owner of Sadie Seasongoods, a website that celebrates all things secondhand. From upcycling ideas and thrifted decor to vintage-centric travel itineraries, Sadie Seasongoods is a one-stop shop for anyone who loves thrifting and approachable repurposing ideas. Sarah is also the author of “Crafting with Flannel” and has been featured in numerous media outlets and magazines.


Super cute idea Sarah!
Thanks, Carlene!
Sarah, you have such an imagination! I’ve seen these steamer baskets so many times but I never saw pine trees in the holes!! Love it and Pinned it!😊
Thank you, Cindy!
You are so darn creative! I wouldn’t have seen the “trees” on the steamer basket. But sure enough, there they were just begging for embroidery. I LOVE the touch of blue on the rim. But of course, blue is my favorite color.
pinned!
gail
Thanks so much, Gail!
What a fun project! It looks great with the threaded trees on the side, blue rim and filled with bristling pine cones! You are so creative!
Thank you, Kathy!
Great job on your makeover.
Thanks so much, Rebecca!
It’s beautiful and brilliant! Hugs,
Thank you so very much, Sandi!
This turned out so cute!!! You are so creative and always think out of the box, I love it!
Thanks, Kristin!
This is brilliant, thanks for sharing.
Thank you, Michelle!
Brilliant upcycle! I can’t imagine anything more perfect to display pine cones!
Thanks, Sara!
I always read your posts but I can never find any of your projects at my stores. Until this one. I saw the insert and remembered this post and I plan on doing this. I have one question. Did you double the embroidery floss? It kind of looks like it in the pictures.
I didn’t double it, but rather I stitched through the holes three times each. I’m sorry for not making that distinction in the tutorial!
As always, a wonderful clever idea. I didn’t see the trees until you pointed them out. Thank you for all the brilliant ideas you post.
Deirdre.
You’re so kind, Deirdre- thank you!